Debugging Hardhat smart contract project with Tenderly
In this article, we will explore how to integrate Tenderly with a sample Hardhat project that implements a staking and rewards system.
While Tenderly docs. will help you going through it, i believe i can give you some more idea about where things can go wrong.
Before that lets check why it's needed:
From a security point of view, while auditing protocols, you will encounter multiple scenarios where keeping track of various variable values in the control flow is not feasible. For example, there can be multiple nested calls with values getting updated in each call frame. In many large projects, it's impractical to track everything mentally, and direct debugging is also not possible if you're using a Hardhat project.
While we have explored some local options. This would be more user friendly option. with possibility of working with multiple teams by sharing the TestNet progress.
Project Overview
The project consists of three main simplified smart contracts:
- Token.sol: An ERC20 token used for staking.
- Staking.sol: A contract that allows users to stake tokens and manage their staked amounts.
- Rewards.sol: A contract with reward logic.
Really short explanation of the contract functionality / entry points for mentioned contracts:
pragma solidity ^0.8.0;

import "./Token.sol";
import "./Rewards.sol";
import "@openzeppelin/contracts/utils/ReentrancyGuard.sol";

/**
 * @notice This code has not been audited and may contain vulnerabilities.
 * Never use in the production.
 */

contract Staking is ReentrancyGuard {
    MyToken public token;
    Rewards public rewards;
    mapping(address => uint256) public stakedAmounts;
    uint256 public totalStaked;

    event Staked(address indexed user, uint256 amount);
    event Unstaked(address indexed user, uint256 amount);

    constructor(MyToken _token, Rewards _rewards) {
        token = _token;
        rewards = _rewards;
    }

    function stake(uint256 amount) public nonReentrant {
        require(amount > 0, "Amount must be greater than 0");
        require(token.transferFrom(msg.sender, address(this), amount), "Transfer failed");
        stakedAmounts[msg.sender] += amount;
        totalStaked += amount;
        emit Staked(msg.sender, amount);
    }

    function unstake(uint256 amount) public nonReentrant {
        require(stakedAmounts[msg.sender] >= amount, "Insufficient staked amount");
        stakedAmounts[msg.sender] -= amount;
        totalStaked -= amount;
        require(token.transfer(msg.sender, amount), "Transfer failed");
        rewards.claimRewards(msg.sender);
        emit Unstaked(msg.sender, amount);
    }

    function getStakedAmount(address staker) public view returns (uint256) {
        return stakedAmounts[staker];
    }

    function getTotalStaked() public view returns (uint256) {
        return totalStaked;
    }
}
Staking.sol
pragma solidity ^0.8.0;

import "./Staking.sol";

/**
 * @notice This code has not been audited and may contain vulnerabilities.
 * Never use in the production.
 */

contract Rewards {
    Staking public staking;
    mapping(address => uint256) public rewards;

    constructor() {}

    function initialize(Staking _staking) external {
        require(address(staking) == address(0), "Already initialized");
        staking = _staking;
    }

    function calculateRewards(address staker) public view returns (uint256) {
        uint256 stakedAmount = staking.getStakedAmount(staker);
        // Simplified reward calculation
        return stakedAmount / 10;
    }

    function claimRewards(address staker) external {
        require(msg.sender == address(staking), "Only staking contract can call this function");
        uint256 reward = calculateRewards(staker);
        rewards[staker] += reward;
    }
}
Rewards.sol
Function-wise Functionality for Staking Contract (Staking.sol)
- constructor(MyToken _token, Rewards _rewards)
- Initializes the staking contract with the
MyTokenandRewardscontract addresses.
- Initializes the staking contract with the
- function stake(uint256 amount) public nonReentrant
- Allows users to stake a specified amount of
MyTokentokens, updating their staked amount and the total staked amount.
- Allows users to stake a specified amount of
- function unstake(uint256 amount) public nonReentrant
- Allows users to unstake a specified amount of
MyTokentokens, updating their staked amount, the total staked amount, and claiming rewards.
- Allows users to unstake a specified amount of
- function getStakedAmount(address staker) public view returns (uint256)
- Returns the staked amount of a specified user.
- function getTotalStaked() public view returns (uint256)
- Returns the total amount of tokens staked in the contract.
Function-wise Functionality for Rewards Contract (Rewards.sol)
- function initialize(address _staking) external
- Initializes the rewards contract with the address of the staking contract.
- function calculateRewards(address staker) public view returns (uint256)
- Calculates the rewards for a specified user based on their staked amount.
- function claimRewards(address staker) external
- Claims the rewards for a specified user, ensuring only the staking contract can call this function.
From now onwards, you can follow the official documentation, but there's something additional I'd like to share that you might not find in the docs.
Setting up Tenderly :
- Install the Tenderly CLI
brew tap tenderly/tenderly
brew install tenderly
tenderly login
Once logged in, you can check tenderly whoami to confirm.
- Install tenderly-hardhat plugin
npm install --save-dev @tenderly/hardhat-tenderly - Import the plugin to your hardhat.config.js/ts file like
const tenderly = require("@tenderly/hardhat-tenderly");. the way of importing will vary based if its .ts or .js file. - Generally if you are using @tenderly/hardhat-tenderly version that is upto 2.4.0 you need to call the
tdly.setup()and set theautomaticVerificationsoption to true like this:tenderly.setup({ automaticVerifications: true });But if your are using the version that is greater than this then you can set theTENDERLY_AUTOMATIC_VERIFICATIONenvironment variable totruefor example with.envfile. Otherwise you might get warning like this.

- Adding tenderly configuration in hardhat configuration:
Where you need to create a virtual TestNet using Tenderly dashboard and add a network with a Tenderly virtual TestNet URL and Tenderly configuration object:
import { HardhatUserConfig } from "hardhat/config";
import "@nomicfoundation/hardhat-toolbox";
import * as tenderly from "@tenderly/hardhat-tenderly";

// tenderly.setup({ automaticVerifications: true }); // <- depends on version you are using as mentioned above.

const config: HardhatUserConfig = {
  solidity: "0.8.19",
  networks: {
    virtualMainnet: {
      url: process.env.TENDERLY_VIRTUAL_MAINNET_RPC!,
    },
  },
  tenderly: {
    // https://docs.tenderly.co/account/projects/account-project-slug
    project: "YOUR PROJECT",
    username: "YOUR USERNAME",
  },
};

export default config;
Deploying and Debugging with tenderly:
Writing the deployment script. How script works is not explained as it is assumed that reader knows it already.
const { ethers } = require("hardhat");
const { expect } = require("chai");

async function main() {
    const [owner, addr1, addr2] = await ethers.getSigners();

    // Deploy the token contract
    const Token = await ethers.getContractFactory("MyToken");
    const token = await Token.deploy(ethers.parseEther("1000000"));
    await token.waitForDeployment();
    console.log("Token deployed to:", token.target);

    // Deploy the rewards contract
    const Rewards = await ethers.getContractFactory("Rewards");
    const rewards = await Rewards.deploy();
    await rewards.waitForDeployment();
    console.log("see rewards instance obj", rewards);
    console.log("Rewards deployed to:", rewards.target);

    // Deploy the staking contract
    const Staking = await ethers.getContractFactory("Staking");
    const staking = await Staking.deploy(token.target, rewards.target);
    await staking.waitForDeployment();
    console.log("Staking deployed to:", staking.target);

    // Initialize the rewards contract with the staking contract address
    await rewards.nativeContract.initialize(staking.target);

    // Mint some tokens for testing
    await token.nativeContract.transfer(await addr1.getAddress(), ethers.parseEther("1000"));
    await token.nativeContract.transfer(await addr2.getAddress(), ethers.parseEther("1000"));

    // Check and log the balances
    const balanceAddr1 = await token.nativeContract.balanceOf(await addr1.getAddress());
    const balanceAddr2 = await token.nativeContract.balanceOf(await addr2.getAddress());

    console.log(`Balance of addr1: ${balanceAddr1} tokens`);
    console.log(`Balance of addr2: ${balanceAddr2} tokens`);

    // Test cases
    console.log("Running test cases...");

    // Test staking tokens
    await token.nativeContract.connect(addr1).approve(staking.nativeContract.getAddress(), ethers.parseEther("100"));
    await staking.nativeContract.connect(addr1).stake(ethers.parseEther("100"));
    expect(await staking.nativeContract.getStakedAmount(await addr1.getAddress())).to.equal(ethers.parseEther("100"));
    expect(await staking.nativeContract.getTotalStaked()).to.equal(ethers.parseEther("100"));

    // Test unstaking tokens
    await staking.nativeContract.connect(addr1).unstake(ethers.parseEther("50"));
    expect(await staking.nativeContract.getStakedAmount(await addr1.getAddress())).to.equal(ethers.parseEther("50"));
    expect(await staking.nativeContract.getTotalStaked()).to.equal(ethers.parseEther("50"));

    // Test failing to unstake more tokens than staked
    await expect(staking.nativeContract.connect(addr1).unstake(ethers.parseEther("100")))
        .to.be.revertedWith('Insufficient staked amount');
}

main()
    .then(() => process.exit(0))
    .catch((error) => {
        console.error(error);
        process.exit(1);
    });
Deployer script
As you can see the script contains code to deploy contracts and to call the functions. and based on the smart contract logic it expects the output.
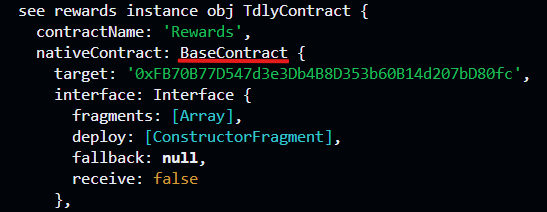
But additionally you can see when calling any functions on the smart contract, the function is actually called on nativeContract and not on contract name variable/instance. That's because once you configure hardhat to use Tenderly the types of these contracts are changed from BaseContract type to TdlyContract . you can check this by printing the contract instance that BaseContract is in the nativeContract . Generally it is directly available when the tenderly is not configured. But here, directly calling the function won't work with tenderly setup.
Additionally it is helpful to use waitForDeployment() on contracts after deploying (as can be seen in the script above) as it will verify the contracts in tenderly TestNets.
Since the automatic contract verification is set to true, you can just run the deployment script with the command like: where the virtualMainnet is the network name in the hardhat config file:
npx hardhat run scripts/deploy.ts --network virtualMainnetOpen tenderly TestNet dashboard and debug the transaction by clicking on the transaction hash.
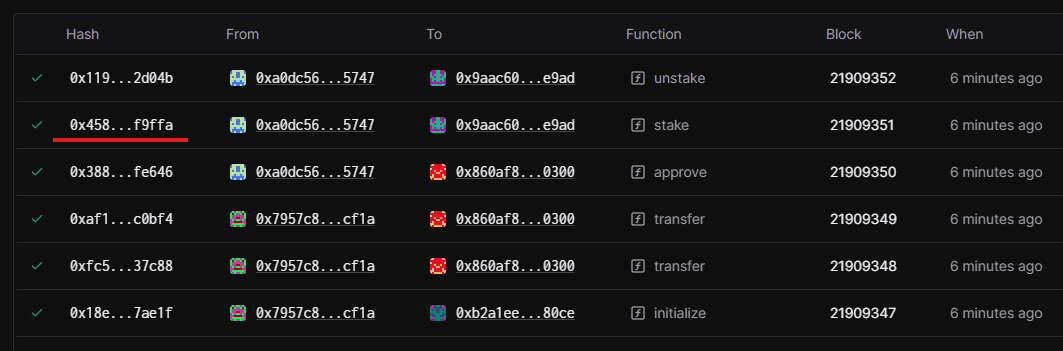
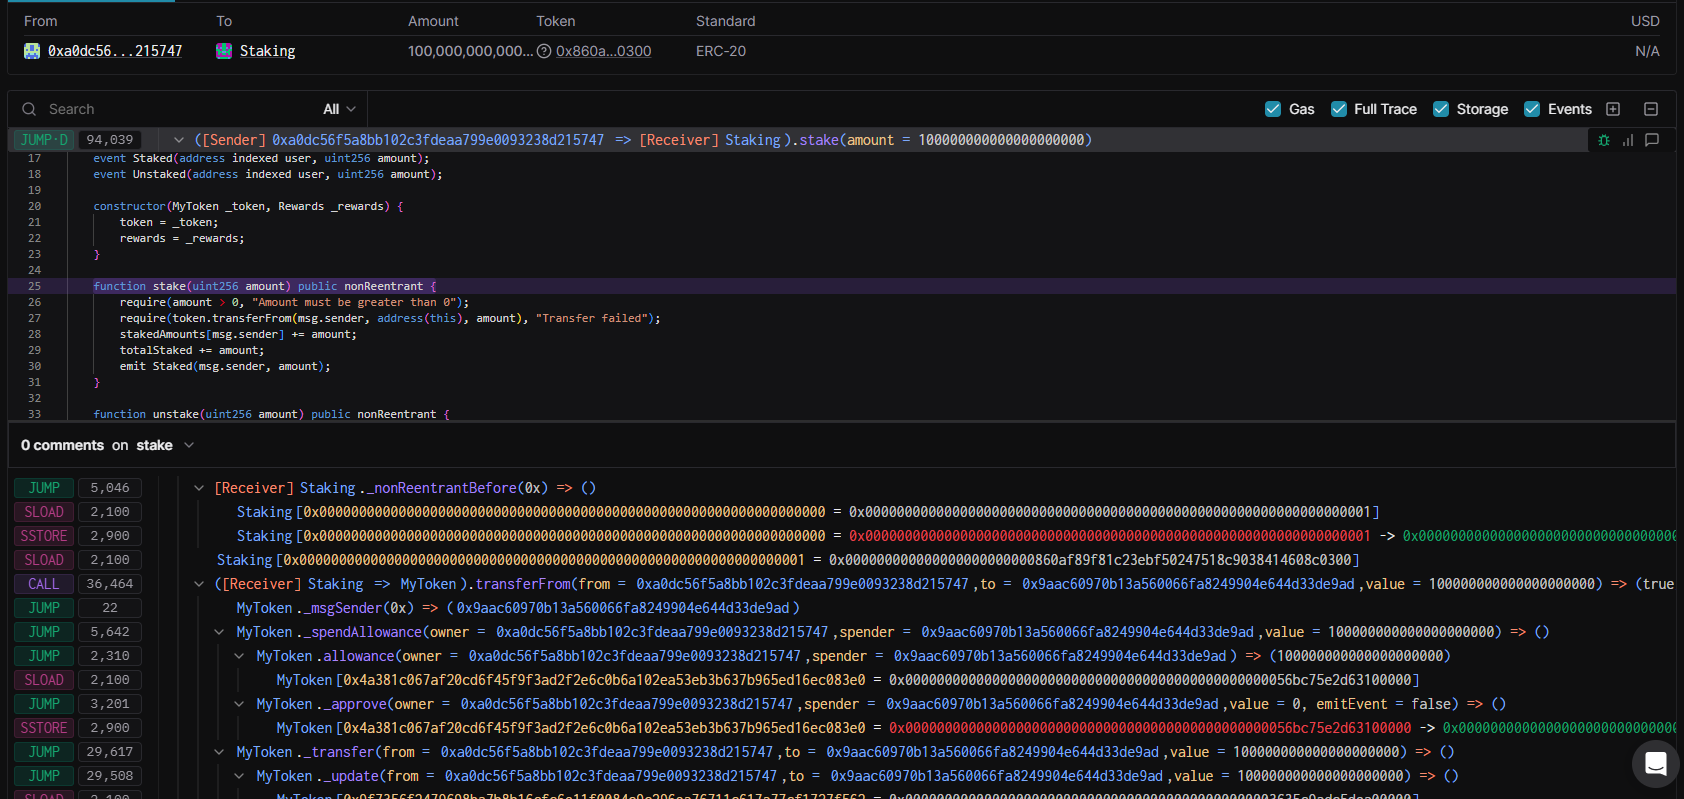
and here we go debugging:
Conclusion:
Overall this article gives an idea about starting with the tenderly TestNets and debugging the local projects. Obviously there is lot to cover on tenderly side. But this article is more about documenting quirks that I discovered while writing the scripts, such as accessing the base contract object correctly to call functions, which I found hard to locate anywhere in the documentation.
Reference:

Stay tuned – exciting blockchain security articles are dropping soon! pic.twitter.com/HeXOXexYHP
— The Caliber (@caliber_tweets) January 12, 2025